

How To Use Windows Server 2003
This affiliate is from the volume
Setting Up the Windows Server 2003 Operating System
If you have installed Microsoft server operating systems earlier, you will exist familiar with the look and feel of the Windows Server 2003 installation process. The familiar blue background with white text is still there for the outset half of the installation and, for the most part, the questions are the same. Y'all still have to printing F8 to have the license understanding, but dissimilar with some older versions, you lot aren't required to page down to read the whole affair get-go anymore. The next step is to gear up the hard drive and partitions you want to install to. Although the process is similar to previous versions, you have some new options to choose from. Follow the instructions to prepare and select your desired partition for installation.
Formatting the Sectionalisation
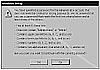
With older versions of the Windows operating organisation, yous had ii options when division the hard bulldoze: NTFS or FAT. You all the same take these familiar options, only two new ones for quick formatting have been added to the list, equally shown in Effigy 3.i.
 Figure 3.ane Options for formatting the Windows Server 2003 partition.
Quick Formatting or Regular Formatting
When you select NTFS or Fat to format the partitioning, the drive must be formatted. This process can take a significant amount of time.
The new "quick" option tin can format the partitions much faster—in some cases more than than 25 times faster! Only exist aware, in this instance the bulldoze is not being truly formatted. The Quick Format option performs merely a high-level format of a deejay—using the tracks and sectors already divers by an earlier formatting. This pick is well-nigh helpful when yous're installing servers that did not previously comprise any confidential information. And it really comes in handy when you're installing a server over and over in the lab.
Fat or NTFS
1 of the about usually asked questions when installing a Windows-based server is, "Should I select FAT or NTFS?" Fatty (which stands for file resource allotment table) has been around for a long time—since the days of MS-DOS. Information technology was upgraded with Windows 95 SR-2, when FAT16 became FAT32, giving us the functionality of long filenames and allowing us to create larger deejay and book sizes.
Although the theoretical sectionalisation size with FAT32 is upwardly to two terabytes, Windows Server 2003 places a limitation that allows volumes only upward to 32GB in size. Your file sizes are also limited; no file can be larger than 4GB (2GB in FAT16).
There are 2 scenarios in which you would take to use the Fat file system. Get-go, you use it if you are building Windows 2003 on a machine that volition have to dual-kicking to an operating organization that does not back up NTFS (such as Windows 95). And second, y'all use information technology if you want the ability to boot the server to a floppy disk (such equally a DOS or Win95 boot disk) to admission the files on the root partition.
CAUTION
Keep in mind, nevertheless, that if you can boot your server to a floppy to access the files stored on the hard drive, then tin someone else!
NTFS (NT File System) is the recommended file system for use with Windows Server 2003, as it was for Windows 2000 and Windows NT servers. NTFS is actually NTFS5 and was upgraded with NT 4.0 Service Pack 4. This file system is less likely to become decadent and is able to recognize errors and bad sectors of a difficult drive. When one of these problems is discovered, the file organization repairs itself automatically.
Windows Server 2003 allows supported book sizes up to 16 terabytes (minus 4KB), and the maximum file size is 16TB (minus 64KB). Additionally, NTFS has better file security, disk compression, and encryption capabilities, and information technology tin can utilise fault-tolerant disk configurations such every bit mirroring and disk striping. So, which file system do you use for Windows Server 2003? The rule of thumb is if you lot don't take to utilize Fat for i of the reasons mentioned here, go with NTFS.
Customizing Regional and Language Options
Afterwards the boot partition is configured, all the operating organization files will be copied at that place. The system will reboot, and the GUI portion of the installation will commence.
When customizing the Regional Options department, you can configure the Standards and Formats. These settings command how the workstation formats numbers, currencies, dates, and times. The Location setting provides you with local information, such as news and weather condition.
In the Languages department, you can modify the text services and input languages. Additionally, you tin install supplemental language support for E Asian languages and back up for circuitous script and right-to-left languages, including Thai.
Personalizing the Software
The Setup Sorcerer next asks for your proper name and that of your arrangement. This data is used during the setup to determine the default computer name. Additionally, information technology will exist displayed on the Windows Server 2003 screen in the Registered To section.
Many companies have a policy in place detailing how these fields are to exist filled out. A common practice is to put the department or location (such equally Man Resources or Oakland) in the Name field and the name of the company in the Organization field.
Inserting a Product Key
If you have installed previous versions of the Windows operating systems, the procedure of inserting a production key volition exist familiar to you. In the past, server and workstation installations required the inserting of a production key to activate the software.
With Windows Server 2003, you still have to input a product key, but in that location are a few unlike scenarios. The Windows Server 2003 activation primal initiative is described in the following sections.
Using a Retail Media Activation Key
When you purchase the installation media from a retail source, you will take to contact Microsoft (either online or by telephone) to activate your production key. This fundamental is unique for each installation. Fortunately, you withal can automate the installation by using technologies such every bit Windows Scripting Host (WSH) and Windows Direction Instrumentation (WMI).
Using a Book Media Activation Fundamental
When you purchase the installation media every bit part of a Microsoft volume licensing plan (such as Open or Select), no activation is required. Additionally, you volition exist able to use a common production primal across all your installations.
Selecting Licensing Modes
Another betoken of confusion for many installers is the topic of licensing modes. When installing Windows Server 2003, as in Windows 2000 and NT, you must select one of two licensing modes for the server. You tin specify Per Server or Per Device.
Note
If you lot are not sure which licensing mode to use for your environs, select Per Server. If necessary, y'all can make a one-time switch from Per Server to Per Device, but the licensing does not permit the contrary switch from Per Device to Per Server.
Per Server Licensing
In Per Server licensing style, each server has a defined number of clients that are immune to connect at any in one case. Each server in the network that uses this manner must have enough customer admission licenses (CALs) purchased to encompass the maximum number of concurrent connections the server is going to support. If the number of connections exceeds the configured number of CALs, clients may be locked out or receive Access Denied messages when they endeavour to connect to network resources.
This choice is typically selected by pocket-size companies with only one Windows Server 2003 system because smaller organizations take a smaller number of users. You lot may too desire to select this option if y'all are configuring a Web server or Remote Access Service (RAS) server. You can configure the maximum number of users who will connect and, even if the customer is not licensed as a Windows Server 2003 networking client, you are non breaking your licensing agreement.
Per Device Licensing
In the Per Device licensing fashion, a CAL is required for each workstation (or seat) that connects to whatsoever licensed server. This includes users running whatsoever Windows operating system, Macintosh, or Unix computers connecting to a Windows file server.
In this scenario, a workstation is not express to connecting to only ane server; customer computers are allowed access to any server within a Windows network, equally long as each client machine is licensed with a CAL.
This is the most mutual licensing option considering most companies have more than than one server. Although the cost of a CAL is more expensive than a Per Server customer license, yous have to pay only once for that user to access an unlimited number of Windows-based servers.
Setting Reckoner Name and Administrator Password
Adjacent, you are prompted to enter a computer name and administrator password for your figurer.
Choosing Your Computer Name
Past default, the setup program suggests a reckoner proper name based on the information you provided before in the Arrangement field of the Personalize Your Software department. You tin (and, in nigh instances, should) change that default name hither. Insert the name yous decided on before in the "Gathering the Data Necessary to Proceed" section of this chapter.
Selecting an Administrator Password
The Setup Sorcerer automatically creates a default business relationship for the administrator called, surprisingly enough, Administrator. This account has local administrative privileges and enables you to manage all local configuration settings for the server. For the sake of security, yous tin can (and should) rename this account later on you consummate the installation.
You lot demand to determine on a countersign for this account. You must enter information technology twice—first in the Password box and then again in the Confirmation box.
As in previous Windows operating systems, the password is case sensitive and can contain upwardly to 127 characters. You should choose your password carefully to ensure the security of the organization.
If yous enter a countersign that does not meet Microsoft's criteria for strong passwords, you will receive a Windows Setup warning, as shown in Figure 3.2.
 Effigy 3.2 Password force warning during setup.
For security reasons, you should never choose a password that does not meet the minimum criteria listed.
Modifying Engagement and Time Settings
The adjacent step is to set the right engagement and time, and select the appropriate time zone for your location. Additionally, if your location uses daylight saving time, make sure the box for that option is checked. A dialog box may or may not popular up, depending on installed hardware.
Modifying Network Settings
Next, you need to decide on the appropriate network settings for the server. These settings configure your computer so that information technology can connect to other computers, networks, and the Internet. You can select either Typical Settings or Custom Settings.
Typical Settings
When you choose Typical Settings, the Setup Wizard automatically configures the default network settings for the server. These default settings include the installation of the Client for Microsoft Networks, file and print admission, and TCP/IP equally the default protocol. Additionally, when configuring the TCP/IP settings, the server searches for a DHCP server. If it finds one, it will configure the server for a dynamic IP accost. If no DHCP server is institute, information technology will configure an Automated Private IP Address (APIPA).
For most companies, the default client, services, and protocols selected will encounter their needs, though you will likely want to change the TCP/IP settings and assign a static address for the server. See the before section "Network Protocol and IP Address of the Server" for more information.
Custom Settings
Selecting Custom Settings allows yous to manually configure the networking components. By default, the Client for Microsoft Networks, File and Printer Sharing for Microsoft Networks, and Cyberspace Protocol (TCP/IP) are selected.
If y'all want to install additional clients, services, and/or protocols, or if y'all want to modify the default configuration for these selections, selecting the Custom Settings option may be in order.
Joining a Workgroup or Reckoner Domain
If y'all are joining an existing domain, you will need the login name and password for a domain administrator in that domain. Alternatively, y'all can have the administrator of the domain add together your computer name into the domain so that your server can connect.
If you lot practise non know the name of the domain that the server will be a member of, or if you do non accept the authoritative rights to join the server to the domain, select a workgroup installation. You can easily join the server to a domain at a later time.
Completing the Installation
After you click Adjacent, the Setup Wizard volition consummate the installation of the server, apply all the configuration settings that you lot specified, and remove all temporary setup files. Upon completion, the calculator will reboot and will load Windows Server 2003.
Logging In
When you're prompted, press Ctrl+Alt+Delete to log in to Windows Server 2003. The default administrator name should be displayed for you. You must type in the password that you lot assigned and click OK to proceed.
Activating Windows Server 2003
If your copy of Windows Server 2003 needs to be activated, you can either click the icon in the organization tray that looks like a pair of aureate and silver keys, or you can choose Start, All Programs, Activate Windows. Yous take the choice of activating Windows via the Internet or by telephone.
Activating Windows over the Net
To activate your system via the Internet, select that choice and click Next. You so are asked whether you want to register with Microsoft. This footstep is optional and not required to activate Windows. If yous register, Microsoft will (with your consent) notify you lot of product updates, new products, events, and special offers.
Selecting Yes, I Want to Register and Activate Windows at the Aforementioned Time brings you to the Collecting Registration Data screen, every bit shown in Effigy 3.iii.
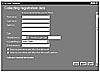 Figure 3.3 Windows registration data drove screen.
Make full out the required information and click Next to continue. This begins the activation process as your server verifies connectivity to the Net. Selecting No, I Don't Want to Register Now; Permit's Just Activate Windows starts the activation process as your server verifies connectivity to the Net. Later on connectivity is verified, you will see a window that confirms your re-create of Windows has been activated. Click OK to close the Activation Windows Wizard.
Activating Windows Server 2003 by Telephone
To actuate Windows Server 2003 by telephone, select Aye, I Want to Phone a Client Service Representative to Activate Windows and click Adjacent to continue. The Activate Windows Wizard quickly generates a new installation ID and continues to the next stage.
You lot are then instructed to select your location and are given a number to call. When yous speak with the client service representative, give him the installation ID that was automatically generated. The representative will then give yous the confirmation ID to enter in step four, shown in Figure iii.iv.
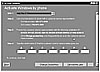 Figure 3.4 Activating Windows Server 2003 by telephone.
Source: https://www.informit.com/articles/article.aspx?p=174154&seqNum=2
Posted by: farrellfroma1981.blogspot.com
0 Response to "How To Use Windows Server 2003"
Post a Comment